Checking the Performance of M1 and M2 Mac GPUs with YOLOv8| Building the Execution Environment and Benchmarking
Aru
Aru's テクログ(Aruaru0)
YOLOv8 has been released, so I tried conducting object detection tasks with custom data, including both training and inference. This article explains the steps for training and inference using Python code.
Furthermore, YOLOv8 also supports object tracking and segmentation.
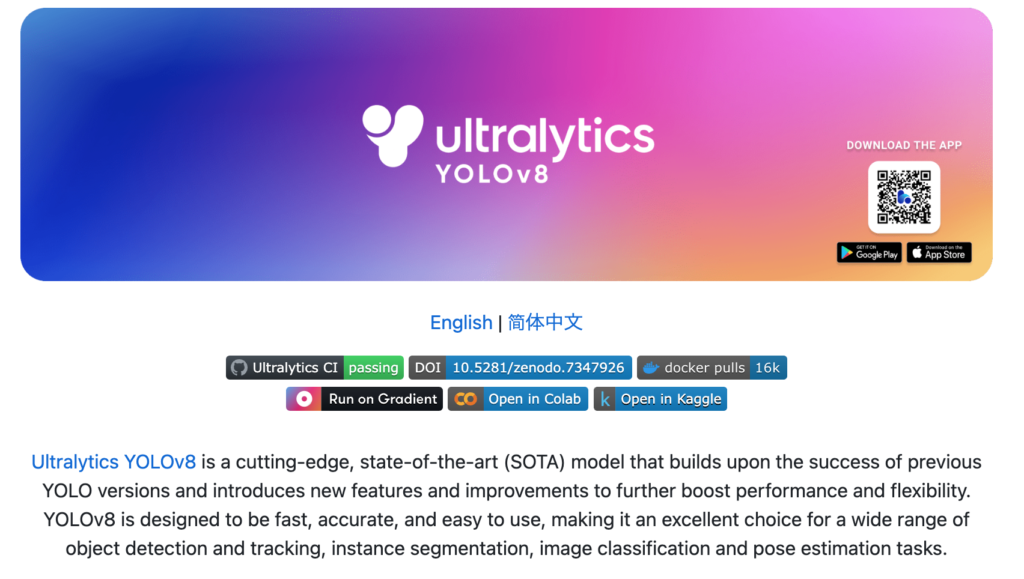
YOLOv8 is an object detection model developed by Ultralytics. It appears to be versatile, as it can be used for tasks such as segmentation and pose estimation in addition to object detection. It’s quite impressive how rapidly models like this one are evolving, considering it was released in January 2023.
YOLOv5 has been quite helpful, so this time, with the purpose of learning how to use it, I would like to go through the entire process of training and inference on custom data using YOLOv8 in Python.”
Here, I decided to use the Car Object Detection dataset available on Kaggle. Instead of Google Colab, I created a Kaggle notebook for this purpose.
Kaggle notebook is here.
I could have used Google Colab, but I chose a Kaggle notebook because it eliminates the need for additional data transfer and related processes.
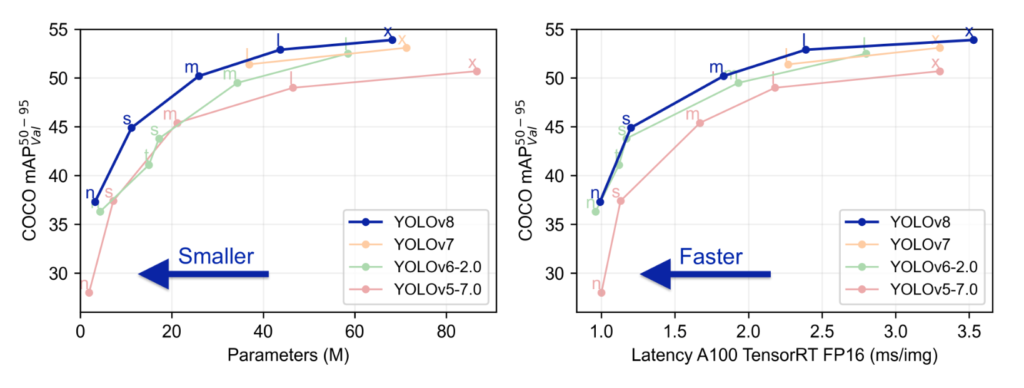
By the way, here’s a graph showcasing the performance of YOLOv8. Looking at this, it seems to offer better performance and faster speed compared to previous models, which is quite promising. However, it’s surprising to see such a significant difference from the YOLOv5. The pace of model development is truly remarkable.
Installing YOLOv8 is very easy. In the case of Google Colab, where Python (3.8 or higher) and PyTorch (1.8 or higher) are already installed, you can simply run the following command.
# install yolov8
!pip install ultralytics
Import YOLO and the necessary libraries for now (I’ve imported some that might not be used in this case).
from ultralytics import YOLO
import os
import random
import shutil
import numpy as np
import pandas as pd
import cv2
import yaml
import matplotlib.pyplot as plt
import glob
from sklearn.model_selection import train_test_splitI used the Car Object Detection dataset from Kaggle. This dataset includes folders for test images, training images, and annotation data for training images in CSV file format. Since this format is not directly compatible with YOLOv8, we’ll need to perform a conversion.
DIR = "/kaggle/working/datasets/cars/"
IMAGES = DIR +"images/"
LABELS = DIR +"labels/"

TRAIN = "/kaggle/input/car-object-detection/data/training_images"
TEST = "/kaggle/input/car-object-detection/data/testing_images"
First, let’s read the CSV file.
df = pd.read_csv("/kaggle/input/car-object-detection/data/train_solution_bounding_boxes (1).csv")
df
This file contains rows with file names and bounding box information, and in cases where a single file has multiple bounding boxes, the same file name is repeated across multiple rows.
To split the data into training and evaluation sets, I extracted unique file names and used the train_test_split function to divide them into two groups, with an 80:20 ratio for training and evaluation, respectively.
files = list(df.image.unique())
files_train, files_valid = train_test_split(files, test_size = 0.2)
Now that we’ve decided on the allocation, the next step is to create dataset folders and place the files accordingly.
First, we’ll create the folders for placing the files in YOLOv8 format.
# make directories
os.makedirs(IMAGES+"train", exist_ok=True)
os.makedirs(LABELS+"train", exist_ok=True)
os.makedirs(IMAGES+"valid", exist_ok=True)
os.makedirs(LABELS+"valid", exist_ok=True)
We’ll copy the image files into the training and evaluation folders, determining where to allocate them using if statements.
train_filename = set(files_train)
valid_filename = set(files_valid)
for file in glob.glob(TRAIN+"/*"):
    fname =os.path.basename(file)
    if fname in train_filename:
        shutil.copy(file, IMAGES+"train")
    elif fname in valid_filename:
        shutil.copy(file, IMAGES+"valid")
We will convert the information from the CSV data into the YOLOv8 format (class ID, X center, Y center, W, H) and store it in a text file with the same name as the image file. The original data is in the format of (xmin, ymin) - (xmax, ymax) for an image size of 676×380. We will convert this into (class ID, X center, Y center, W, H) format while scaling it to a range of 0.0 to 1.0.
for _, row in df.iterrows():
    image_file = row['image']
    class_id = "0"
    x = row['xmin']
    y = row['ymin']
    width = row['xmax'] - row['xmin']
    height = row['ymax'] - row['ymin']

    x_center = x + (width / 2)
    y_center = y + (height / 2)
    x_center /= 676
    y_center /= 380
    width /= 676
    height /= 380

    if image_file in train_filename:
        annotation_file = os.path.join(LABELS) + "train/" + image_file.replace('.jpg', '.txt')
    else:
        annotation_file = os.path.join(LABELS) + "valid/" + image_file.replace('.jpg', '.txt')

    with open(annotation_file, 'a') as ann_file:
        ann_file.write(f"{class_id} {x_center} {y_center} {width} {height}n")
As a result, the folder structure looks as follows:
datasets
└── cars
    ├── images
    │   ├── train
    │   │   ├── xxxx.jpg
    │   │   └── xxxx.jpg
    │   └── val
    │       ├── xxxx.jpg
    │       └── xxxx.jpg
    └── labels
        ├── train
        │   ├── xxxx.txt
        │   └── xxxx.txt
        └── val
            ├── xxxx.txt
            └── xxxx.txt
With that, the dataset preparation is complete.
Before training, we’ll create a YAML file defining the dataset. In a Jupyter notebook, you can use the %%writefile magic command to write the cell content to a file as follows.
%%writefile dataset.yaml
# Path
path: ./cars
train: images/train
val: images/valid

# Classes
nc: 1
names: ['car']
In a Kaggle notebook, it may attempt to access WandB, so I’ve stopped it. If you have an account, you can connect and save experiment records, which can be quite useful.
# disable wandb
import wandb
wandb.init(mode="disabled")
Once you have the YAML file and the dataset ready, you can proceed with the training. Then, you’ll just need to wait for the training to finish.
model = YOLO('yolov8n.pt')
model.train(data="dataset.yaml", epochs=100, batch=8)
YOLOv8 comes in various model sizes, and for this project, I chose the smallest model.
There are numerous arguments that can be specified for training. After taking a quick look at the list of arguments, it seems there are plenty of options for fine-tuning. You can switch schedulers, enable or disable label smoothing, and make detailed adjustments.
| Key | Value | Description |
|---|---|---|
model | None | path to model file, i.e. yolov8n.pt, yolov8n.yaml |
data | None | path to data file, i.e. coco128.yaml |
epochs | 100 | number of epochs to train for |
patience | 50 | epochs to wait for no observable improvement for early stopping of training |
batch | 16 | number of images per batch (-1 for AutoBatch) |
imgsz | 640 | size of input images as integer |
save | True | save train checkpoints and predict results |
save_period | -1 | Save checkpoint every x epochs (disabled if < 1) |
cache | False | True/ram, disk or False. Use cache for data loading |
device | None | device cuda device = 0 or device = 0,1,2,3 or device=’cpu’ or device=’mps’ for M1/M2 mac |
workers | 8 | number of worker threads for data loading (per RANK if DDP) |
project | None | project name |
name | None | experiment name |
exist_ok | False | whether to overwrite existing experiment |
pretrained | False | (bool or str) whether to use a pretrained model (bool) or a model to load weights from (str) |
optimizer | 'auto' | optimizer to use, choices=[SGD, Adam, Adamax, AdamW, NAdam, RAdam, RMSProp, auto] |
verbose | False | whether to print verbose output |
seed | 0 | random seed for reproducibility |
deterministic | True | whether to enable deterministic mode |
single_cls | False | train multi-class data as single-class |
rect | False | rectangular training with each batch collated for minimum padding |
cos_lr | False | use cosine learning rate scheduler |
close_mosaic | 0 | (int) disable mosaic augmentation for final epochs (0 to disable) |
resume | False | resume training from last checkpoint |
amp | True | Automatic Mixed Precision (AMP) training, choices=[True, False] |
fraction | 1.0 | dataset fraction to train on (default is 1.0, all images in train set) |
profile | False | profile ONNX and TensorRT speeds during training for loggers |
lr0 | 0.01 | initial learning rate (i.e. SGD=1E-2, Adam=1E-3) |
lrf | 0.01 | final learning rate (lr0 * lrf) |
momentum | 0.937 | SGD momentum/Adam beta1 |
weight_decay | 0.0005 | optimizer weight decay 5e-4 |
warmup_epochs | 3.0 | warmup epochs (fractions ok) |
warmup_momentum | 0.8 | warmup initial momentum |
warmup_bias_lr | 0.1 | warmup initial bias lr |
box | 7.5 | box loss gain |
cls | 0.5 | cls loss gain (scale with pixels) |
dfl | 1.5 | dfl loss gain |
pose | 12.0 | pose loss gain (pose-only) |
kobj | 2.0 | keypoint obj loss gain (pose-only) |
label_smoothing | 0.0 | label smoothing (fraction) |
nbs | 64 | nominal batch size |
overlap_mask | True | masks should overlap during training (segment train only) |
mask_ratio | 4 | mask downsample ratio (segment train only) |
dropout | 0.0 | use dropout regularization (classify train only) |
val | True | validate/test during training |
Similar to YOLOv5, the results include graphs stored as images.
The location where they are stored is ‘./runs/detect/train/results.png‘. You can display it using the following code:
from IPython.display import Image

Image("/kaggle/working/runs/detect/train/results.png")
Looking at this, you can see that the loss is steadily decreasing, indicating progress in training. When checking metrics like mAP50-95, it seems that there is potential for further learning with more epochs. However, observing mAP50, it suggests that training is already showing promise after around 10 iterations.
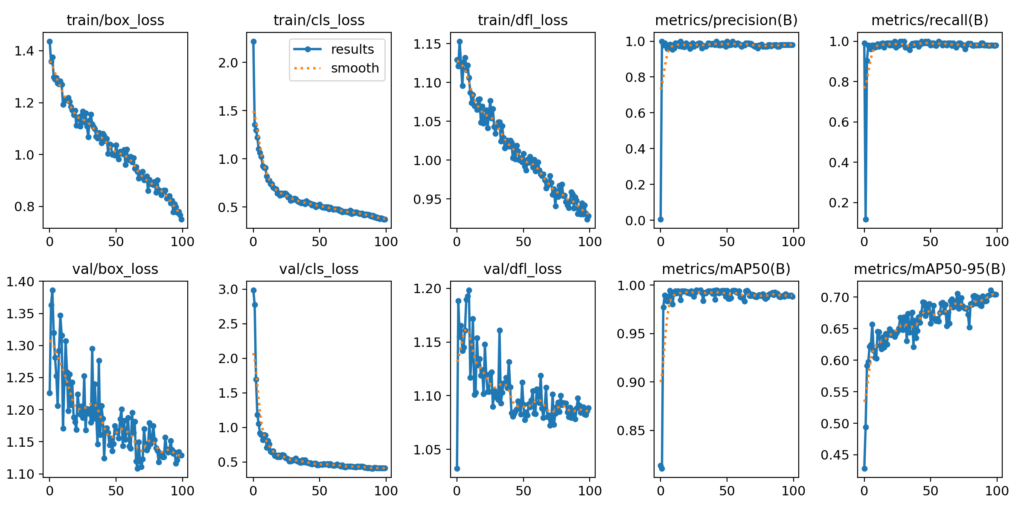
It appears that the model already has a good grasp of detecting cars from the beginning, and the fine-tuning process is helping improve it.
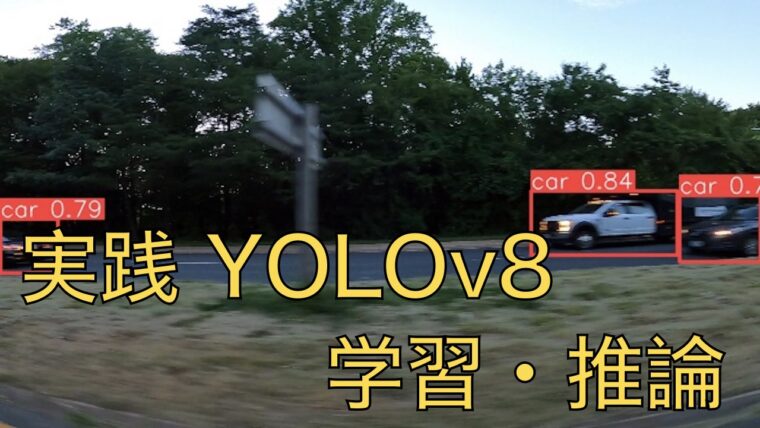
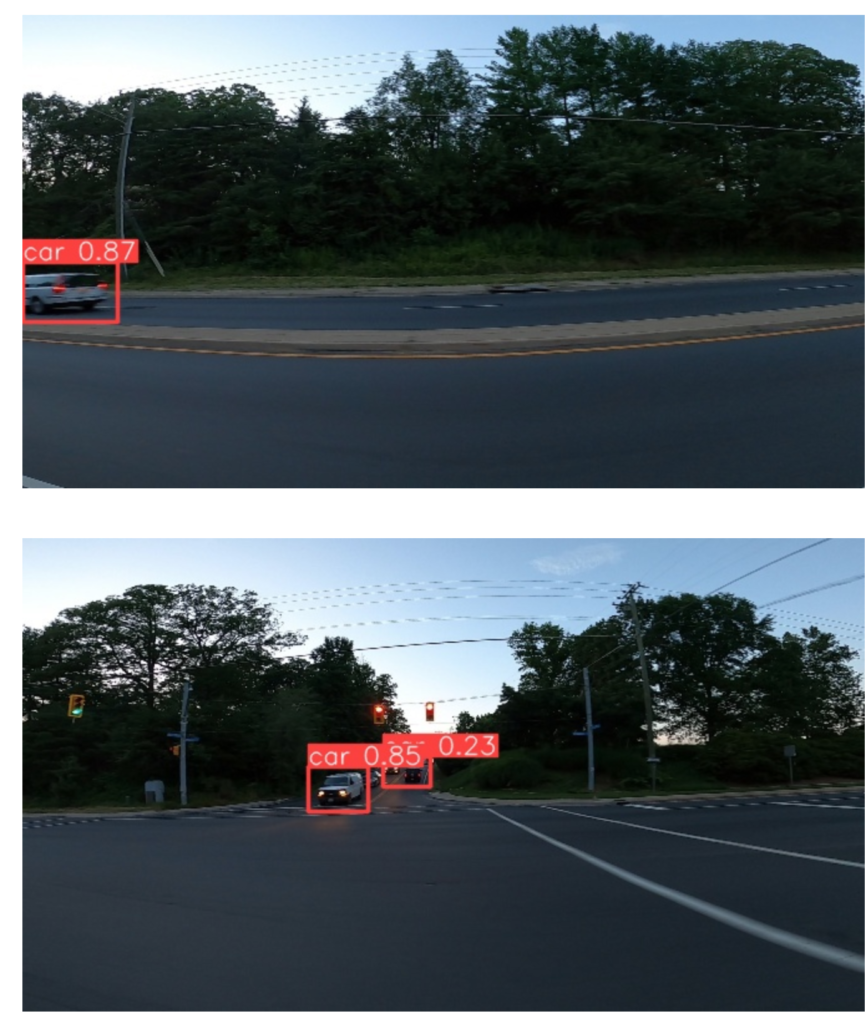
The inference code is also very simple. First, we create a model by loading the final results of the training, and specify the image file. In this case, I used ‘testing_images,’ which was not used for training. Additionally, I’ve set ‘save=True’ to save the result image. I’ve also set detection thresholds using 'conf=0.2' and 'iou=0.5'.
model = YOLO('./runs/detect/train/weights/last.pt')
ret = model("/kaggle/input/car-object-detection/data/testing_images",save=True, conf=0.2, iou=0.5)
There are quite a few parameters to configure on the inference side as well.
| Key | Value | Description |
|---|---|---|
source | 'ultralytics/assets' | source directory for images or videos |
conf | 0.25 | object confidence threshold for detection |
iou | 0.7 | intersection over union (IoU) threshold for NMS |
half | False | use half precision (FP16) |
device | None | device to run on, i.e. cuda device=0/1/2/3 or device=cpu |
show | False | show results if possible |
save | False | save images with results |
save_txt | False | save results as .txt file |
save_conf | False | save results with confidence scores |
save_crop | False | save cropped images with results |
hide_labels | False | hide labels |
hide_conf | False | hide confidence scores |
max_det | 300 | maximum number of detections per image |
vid_stride | False | video frame-rate stride |
line_width | None | The line width of the bounding boxes. If None, it is scaled to the image size. |
visualize | False | visualize model features |
augment | False | apply image augmentation to prediction sources |
agnostic_nms | False | class-agnostic NMS |
retina_masks | False | use high-resolution segmentation masks |
classes | None | filter results by class, i.e. class=0, or class=[0,2,3] |
boxes | True | Show boxes in segmentation predictions |
You can configure the source as follows. It appears that you can input directly from sources like YouTube or rtsp.
| source | value | data type | description |
|---|---|---|---|
| image | 'image.jpg' | str or Path | Single image file. |
| URL | 'https://ultralytics.com/images/bus.jpg' | str | URL to an image. |
| screenshot | 'screen' | str | Capture a screenshot. |
| PIL | Image.open('im.jpg') | PIL.Image | HWC format with RGB channels. |
| OpenCV | cv2.imread('im.jpg') | np.ndarray of uint8 (0-255) | HWC format with BGR channels. |
| numpy | np.zeros((640,1280,3)) | np.ndarray of uint8 (0-255) | HWC format with BGR channels. |
| torch | torch.zeros(16,3,320,640) | torch.Tensor of float32 (0.0-1.0) | BCHW format with RGB channels. |
| CSV | 'sources.csv' | str or Path | CSV file containing paths to images, videos, or directories. |
| video | 'video.mp4' | str or Path | Video file in formats like MP4, AVI, etc. |
| directory | 'path/' | str or Path | Path to a directory containing images or videos. |
| glob | 'path/*.jpg' | str | Glob pattern to match multiple files. Use the * character as a wildcard. |
| YouTube | 'https://youtu.be/Zgi9g1ksQHc' | str | URL to a YouTube video. |
| stream | 'rtsp://example.com/media.mp4' | str | URL for streaming protocols such as RTSP, RTMP, or an IP address. |
The result images are stored in ‘./runs/detect/predict/‘. When you look at them, it seems that the predictions are accurate.
I gave YOLOv8 a quick try. Personally, it feels more refined than YOLOv5. I haven’t explored all the parameters that can be configured for training, but it seems like there are a lot of fine-grained settings available.
I’m likely to use this for a while. Since it’s being referred to as ‘YOLO’ from Python, I wonder if this interface will be unified in the future?