
AtCoder LibraryをGo言語に移植してみた
Aru
Aru's テクログ(Aruaru0)

この記事では、Go言語で自作したパッケージ/モジュールをGithubに登録し、インポートして利用する手順を詳しく解説します。今回は1つのGithubリポジトリで複数のモジュールを管理する場合を想定しています。Go言語でのパッケージ開発や、Githubでのモジュール公開に興味がある方の参考になれば幸いです。
Go言語では、Githubから直接モジュールをインポートすることができます。自分で作成したモジュールも、Githubに公開することで他のプログラムから簡単にインポートして利用できます。
この記事では、自作のライブラリをGithubに登録し、他のプロジェクトで活用できるようにする手順を詳しく解説します。
「パッケージを作成してGithubにアップしたけどインポートがうまくいかない」といった悩みがある方は、とりあえずここで紹介する手順でうまくいったので、一度試してみてください。
ライブラリを作成するフォルダを作成します。ここでは、gmodというフォルダを作成しました
mkdir gmod
cd gmodgmod
├── README.md
├── SequenceProcessor
│ ├── README.md
│ ├── combinations.go
│ ├── combinations_test.go
│ ├── next_permutations.go
│ └── next_permutations_test.go
├── go.mod
└── samples
└── SequenceProcessor
└── main.go最初にgo.modを作成しておきます。このとき、モジュール名は後で作成する予定のgithubのリポジトリ名に揃えておくと良いです。今回は、github.com/aruaru0/gmodとして登録する予定なので、以下のようになります。
go mod init github.com/aruaru0/gmodここでは、順列を列挙するNextPermutationsという関数と、組み合わせを列挙するCombinationsという関数を作成します。これらのパッケージ名はgmod/SequenceProcessorとします

具体的には、SequenceProcessorというフォルダを作成してそこにプログラムを格納します。
mkdir SequenceProcessor
cd SequenceProcessor以下の4つのプログラムをgmod/SequenceProcessorフォルダ内に作成します。
【next_permutations.go】
package SequenceProcessor

import "sort"

// NextPermutation generates the next permutation of the sortable collection x in lexical order.
//
// It takes a sort.Interface as a parameter, which represents the collection to be permuted.
// It returns a boolean indicating whether a next permutation exists.
func NextPermutation(x sort.Interface) bool {
	n := x.Len() - 1
	if n < 1 {
		return false
	}
	j := n - 1
	for ; !x.Less(j, j+1); j-- {
		if j == 0 {
			return false
		}
	}
	l := n
	for !x.Less(j, l) {
		l--
	}
	x.Swap(j, l)
	for k, l := j+1, n; k < l; {
		x.Swap(k, l)
		k++
		l--
	}
	return true
}
【next_permutations_test.go】
package SequenceProcessor

import (
	"sort"
	"testing"
)

func TestNextPermutation(t *testing.T) {
	a := []int{1, 2, 3}

	exp := [][]int{
		{1, 2, 3},
		{1, 3, 2},
		{2, 1, 3},
		{2, 3, 1},
		{3, 1, 2},
		{3, 2, 1},
	}
	cnt := 0
	for pos := 0; ; pos++ {
		// fmt.Println(a, exp[pos])
		for i := 0; i < len(a); i++ {
			if a[i] != exp[pos][i] {
				t.Error("mismatch a=1", a, "!=", exp[pos])
			}
		}
		cnt++
		if !NextPermutation(sort.IntSlice(a)) {
			break
		}
	}
	if cnt != len(exp) {
		t.Error("mismatch cnt", cnt, "!=", len(exp))
	}
}
【combinations.go】
package SequenceProcessor

// combinations generates all possible combinations of the given list with the specified length.
//
// list is the input list of integers, k is the length of the combinations, and buf is the buffer size of the output channel.
// chan []int is the channel that outputs all combinations.
func Combinations(list []int, k, buf int) (c chan []int) {
	c = make(chan []int, buf)
	n := len(list)

	pattern := make([]int, k)

	var body func(pos, begin int)
	body = func(pos, begin int) {
		if pos == k {
			t := make([]int, k)
			copy(t, pattern)
			c <- t
			return
		}

		for num := begin; num < n+pos-k+1; num++ {
			pattern[pos] = list[num]
			body(pos+1, num+1)
		}
	}
	go func() {
		defer close(c)
		body(0, 0)
	}()

	return
}
【combinations_test.go】
package SequenceProcessor

import (
	"testing"
)

func TestCombinations(t *testing.T) {
	a := []int{1, 2, 3, 4}

	exp := [][]int{
		{1, 2},
		{1, 3},
		{1, 4},
		{2, 3},
		{2, 4},
		{3, 4},
	}

	cnt := 0
	for e := range Combinations(a, 2, 1) {
		for i := 0; i < len(e); i++ {
			if e[i] != exp[cnt][i] {
				t.Error("mismatch ", e, "!=", exp[cnt])
			}
		}
		cnt++
	}

	if cnt != len(exp) {
		t.Error("mismatch cnt", cnt, "!=", len(exp))
	}
}
作成したら、テストを実行し動作を確認してください。
go test以下のようにテストが全てパスしたらOKです。
PASS
ok github.com/aruaru0/gmod/SequenceProcessor 0.623sgo mod tidyを実行しておきます。今回は、特になにも更新されませんが、他のモジュールなどを利用している場合はgo.sumが作られます。
go mod tidy以上で、プログラム側は完成です。
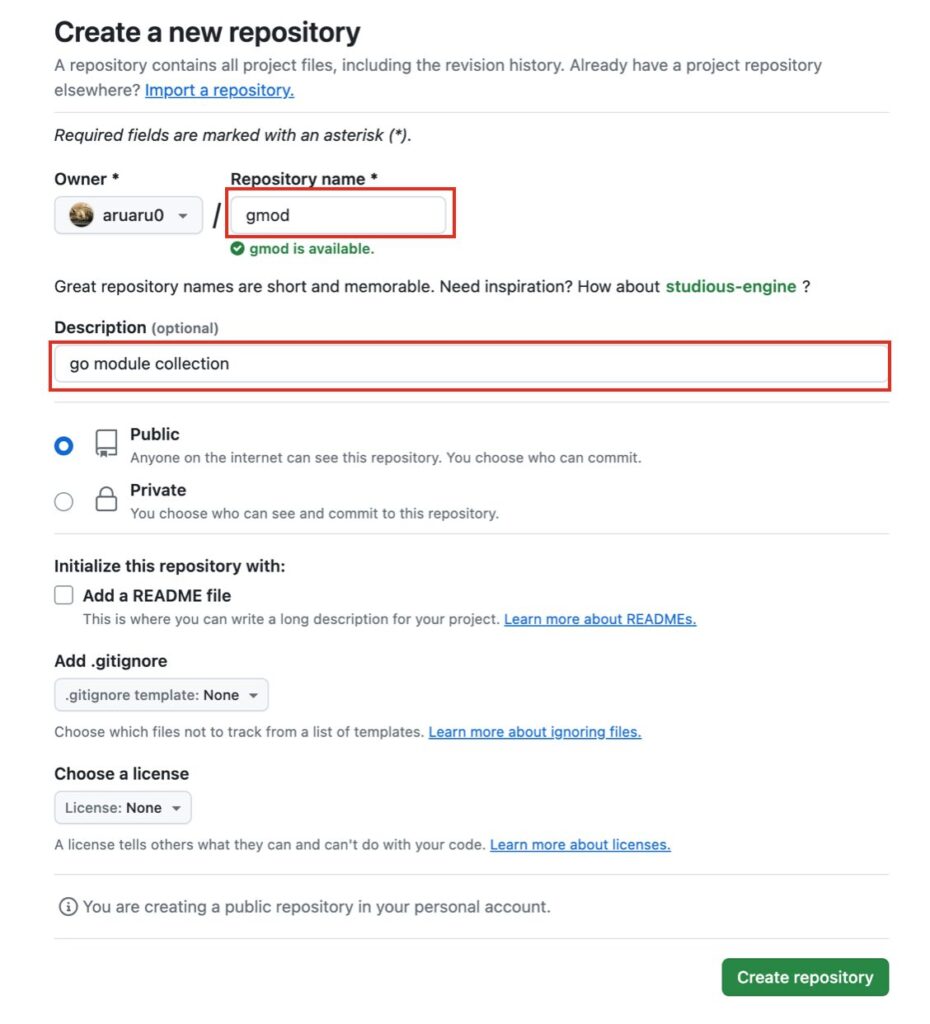
githubでリポジトリを作成します。今回は以下のように設定して作成しました。
作成すると以下のような画面が表示されますので、赤枠のコードに従ってgmodフォルダでコマンドを実行します。
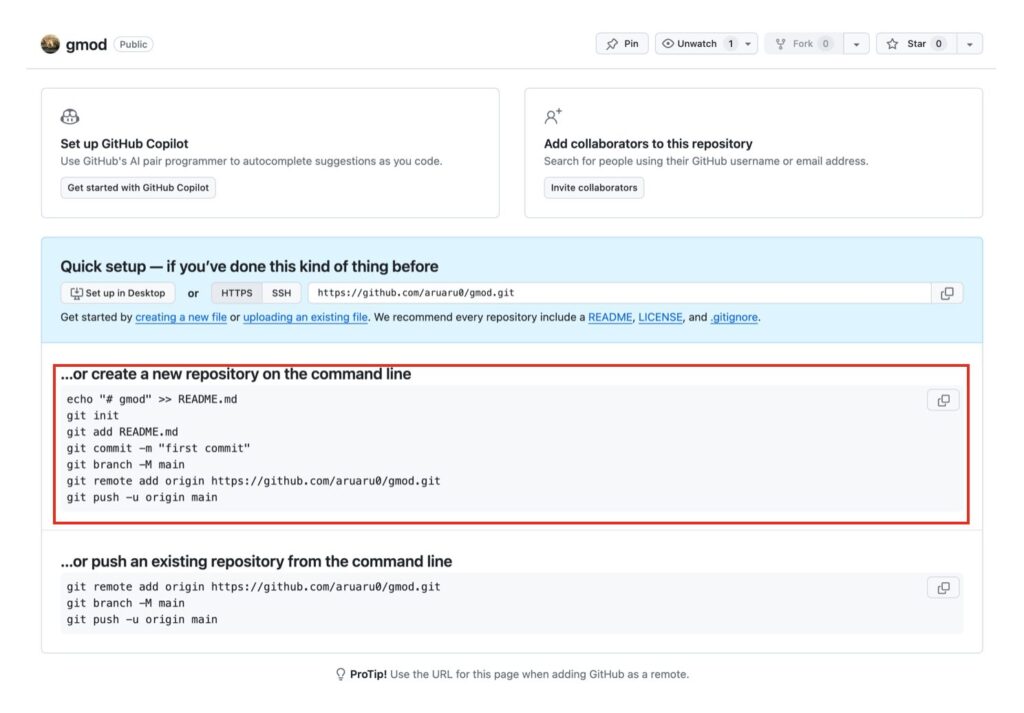
作成したコードをgithub側に追加します。これでgithubへの登録は完了です
git add .
git commit -m "add functions"
git push別のフォルダに移動して(例えば~tmp/testなど)、プログラムを作成します。
package main

import (
	"fmt"
	"sort"

	sp "github.com/aruaru0/gmod/SequenceProcessor"
)

func main() {
	a := []int{1, 2, 3}

	for {
		fmt.Println(a)
		if !sp.NextPermutation(sort.IntSlice(a)) {
			break
		}
	}
}
github.com/aruaru0/gmod/SequenceProcessorを利用するために、go getを実行します。
go get github.com/aruaru0/gmod/SequenceProcessorあとは、go run test.goで実行できます。
[1 2 3]
[1 3 2]
[2 1 3]
[2 3 1]
[3 1 2]
[3 2 1]新しいバージョンに書き換えても以前のバージョンがダウンロードされる場合は、@以降にバージョン番号をつけてgetします。
具体的にはGithubのSHAを調べてコピーし、@をつけてgetする
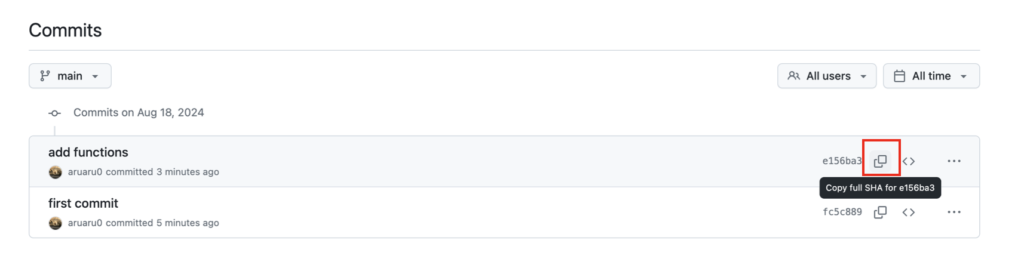
go get github.com/aruaru0/gmod/SequenceProcessor@xxxxxx※ある程度完成したらtagでバージョン番号をつけておくことをお勧めします。
古いバージョンのキャッシュを削除してバージョンを指定してインストールする場合は、以下のようにします(下記ではタグv0.0.0のバージョンをインストール)
go clean --modcache
go get github.com/aruaru0/gmod@v0.0.0作成したライブラリを利用する場合のポイントです。
作らなくても問題はないですが、ライブラリ修正時に動作しなくならないように、利用時にはバージョン管理をしておくことをお勧めします。基本的には、作成したプログラムのフォルダで以下のコマンドを実行すればOKです。
xxxxには自由に設定できます。
go mod init xxxxx
go mod tidy
go mod tidyは、新たにパッケージを利用した場合、削除した場合などに、こまめに実行した方が良いかもしれません。
モジュールを自作し、githubに登録、登録したモジュールを利用する方法について解説しました。自身のライブラリをgithubに置いておくと便利です。
1つgithubにリポジトリを作っておけば、あとはここに追加していけばよいので楽です。