Gemini CLIインストール・アップデート方法
Aru
Aru's テクログ(Aruaru0)

LMStudioに公式のPython SDK(lmstudio-python)が追加され、プログラムからローカルに動作するLLM(大規模言語モデル)を直接呼び出せるようになりました。本記事では、LMStudioにロードしたモデルに対して、PythonからAPI経由でチャットを行う方法やツール呼び出し(tool use)の実装方法を具体的に解説します。これを使うとAIエージェントの実装も可能になります。
OpenAIのAPIを利用して、ツールを呼び出す方法は以下の記事を参照してください。

LMStudioにPython SDKが準備されました。これを使うとLMStudioにロードしたLLMを自分のプログラムから呼び出しての実行を簡単に行うことが可能です。
以前の記事で、LMStuidoのサーバー機能を使う方法をいくつか紹介しましたが、LMStudioだけをターゲットにするのであればこちらのAPIを使った方が楽そうです。
ただ、以前の記事の方法ならOpenAIのChatGPTなども同じ方法で呼び出すことが可能なので、LMStudioを使ってテストし、最終的にはChatGPTも選べるようにするのであれば以前の記事の方法がよいかもしれません。
この記事では、PythonプログラムでChatを行う方法とツール呼び出しについて解説します。
SDKを利用するにはlmsudioのライブラリをインストールする必要があります。pipの場合は、以下のコマンドでインストールできます。
pip install lmstudioまずは、チャットボットを作成してみます。かなり短いコードでチャットボットを作成できます。自分のプログラムでうまく使えば面白そうです。
入力を投げたあと、返答を待って表示するタイプのチャットボットの例です。マークダウンに対応しているので出力結果がマークダウン形式の場合は装飾をおこなって表示できます。
import lmstudio as lms
from rich.markdown import Markdown
from rich.console import Console

model = lms.llm()
chat = lms.Chat("You are a task focused AI assistant")

console = Console()

while True:
    console.print(Markdown("# You:"))
    try:
        user_input = input("You (leave blank to exit): ")
    except EOFError:
        print()
        break
    if not user_input:
        break
    chat.add_user_message(user_input)
    result = model.respond(chat)
    console.print(Markdown("# Bot: "))#, flush=True)
    console.print(Markdown(result.content))
    console.print()
    console.print("---")
    console.print("Model used:", result.model_info.display_name)
    console.print("Predicted tokens:", result.stats.predicted_tokens_count)
    console.print("Time to first token (seconds):", result.stats.time_to_first_token_sec)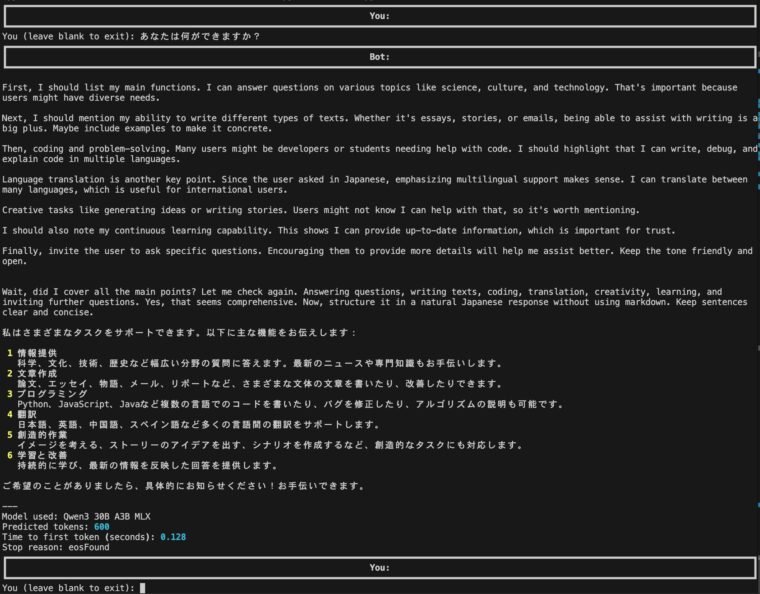
console.print("Stop reason:", result.stats.stop_reason)model=lms.llm()でライブラリを初期化しますchat=lms.Chat(...)で、チャット用のオブジェクトを生成します。...の部分にはシステムプロンプトを入力しますchat.add_user_message(...)で入力したメッセージを追加model.respond(chat)で、メッセージを送信して結果を受け取るresult.contentに応答文が格納されているので、これを表示するresultには、モデル名やトークン数や返答時間なども格納されています。ここでは、情報を表示しています。出力例です。今回は推論モデルのqwen3-30b-a3b-mlxを使ったので、<think></think>の部分(英語部分)が表示されています。このように、チャットボットを簡単に作ることができます。
出力をストリーミング(回答がリアルタイム表示)されるバージョンです。利用する関数が少し異なりますが基本的な流れは同じです。
import lmstudio as lms


model = lms.llm()
chat = lms.Chat("You are a task focused AI assistant")


while True:
    try:
        user_input = input("You (leave blank to exit): ")
    except EOFError:
        print()
        break
    if not user_input:
        break
    chat.add_user_message(user_input)
    prediction_stream = model.respond_stream(
        chat,
        on_message=chat.append,
    )
    print("Bot: ", flush=True)
    for fragment in prediction_stream:
        print(fragment.content, end="", flush=True)
    print()

    result = prediction_stream.result()
    print("Model used:", result.model_info.display_name)
    print("Predicted tokens:", result.stats.predicted_tokens_count)
    print("Time to first token (seconds):", result.stats.time_to_first_token_sec)
print("Stop reason:", result.stats.stop_reason)model.respont_stream(...)でストリーミング応答を指定していますprediction_streamを受け取りながらfragment.content表示していますストリーミングでmarkdown表示に対応するのは少し面倒なので、今回はMarkdown表示していません。こちらのプログラムはストリーミングによる応答が行われるため、回答が始まるまでのレスポンスが短くなります。
以下、設定できるパラメータです。
LLMのオブジェクト呼び出し時にには、max_tokensなどが指定できます。
import lmstudio as lms
model = lms.llm("qwen3-4b", config={
    "contextLength": 8192,
})応答時のパラメータはrespond, respond_stream関数のconfigパラメータで行います。設定できるパラメータには、temperature, maxTokens, topP, topKなどがあります。
# 非ストリーミング
result = model.respond(chat, config={
    "temperature": 0.6,
    "maxTokens": 50,
})

# ストリーミング
prediction_stream = model.respond_stream(chat, config={
    "temperature": 0.6,
    "maxTokens": 50,
})以前の記事でTool Useの方法を紹介しましたが、LMStudioのPython SDKに機能が搭載されました。こちらを使った方がより楽に呼び出しが可能ですので紹介します。
ツールの呼び出しの例です。以下のように記述することでadd()とis_prime()がツールとして呼び出すことができるようになります。各関数の定義の次の行のコメントには、ツールの機能を書く必要があります。
import math
import lmstudio as lms
from rich.markdown import Markdown
from rich.console import Console
import re

def remove_think_tags(text):
    return re.sub(r'<think>.*?</think>', '', text, flags=re.DOTALL)


def add(a: int, b: int) -> int:
    """Given two numbers a and b, returns the sum of them."""
    print("*"*80)
    print(f"call add({a}, {b})")
    print("*"*80)
    return a + b

def is_prime(n: int) -> bool:
    """Given a number n, returns True if n is a prime number."""
    print("*"*80)
    print(f"call is_prime({n})")
    print("*"*80)
    if n < 2:
        return False
    sqrt = int(math.sqrt(n))
    for i in range(2, sqrt):
        if n % i == 0:
            return False
    return True

def print_message(message) :
    global console
    if message.role == "assistant" :
        for e in message.content :
            if e.type == "text" :
                console.print(Markdown(remove_think_tags(e.text)))

console = Console()

# model = lms.llm("qwen3-4b")
model = lms.llm("qwen3-30b-a3b-mlx")
model.act(
  "Is the result of 12345 + 45668 a prime? Think step by step.",
  [add, is_prime],
  on_message=print_message,
)model.act(...)を呼び出します[add, is_prime]の部分は利用できるツールの設定ですon_messageで表示を行う関数を定義しますprint_message(...)では、アシスタントが返したテキストを返しますremove_think_tags()は、<think></think>を非表示にするために利用していますlms.llm(...)で、qwen3-30b-a3b-mlxを利用していますがここを変更することで他のモデルを指定することもできます。

確認はしていますが、Tool Useに対応したモデルのみが関数呼び出しに対応しています。Tool Useに対応しているかどうかはLLMStudioのモデル一覧にあるアイコン(ハンマーのようなアイコンがあるかないか)でわかります。

実行結果は以下のようになります。addとis_primeが呼び出されて、その後に回答が戻っていることがわかります。

すこし本格的なものを作ってみます。このプログラムは、必要があればWikipedia(英語)を検索して回答するものです。
Wikipediaを呼び出す部分については以下の記事を参考にしてください。
import lmstudio as lms
import json
import urllib.parse
import urllib.request


def fetch_wikipedia_content(search_query: str) -> dict:
    """
    Search Wikipedia and fetch the introduction of the most relevant article.
    Always use this if the user is asking for something that is likely on wikipedia.
    If the user has a typo in their search query, correct it before searching.
    """

    try:
        # Search for most relevant article
        search_url = "https://en.wikipedia.org/w/api.php"
        search_params = {
            "action": "query",
            "format": "json",
            "list": "search",
            "srsearch": search_query,
            "srlimit": 1,
        }

        url = f"{search_url}?{urllib.parse.urlencode(search_params)}"
        with urllib.request.urlopen(url) as response:
            search_data = json.loads(response.read().decode())

        if not search_data["query"]["search"]:
            return {
                "status": "error",
                "message": f"No Wikipedia article found for '{search_query}'",
            }

        # Get the normalized title from search results
        normalized_title = search_data["query"]["search"][0]["title"]

        # Now fetch the actual content with the normalized title
        content_params = {
            "action": "query",
            "format": "json",
            "titles": normalized_title,
            "prop": "extracts",
            "exintro": "true",
            "explaintext": "true",
            "redirects": 1,
        }

        url = f"{search_url}?{urllib.parse.urlencode(content_params)}"
        with urllib.request.urlopen(url) as response:
            data = json.loads(response.read().decode())

        pages = data["query"]["pages"]
        page_id = list(pages.keys())[0]

        if page_id == "-1":
            return {
                "status": "error",
                "message": f"No Wikipedia article found for '{search_query}'",
            }

        content = pages[page_id]["extract"].strip()
        print("*"*80)
        print(f"Search Wikipedia page : {search_query}")
        print("-"*80)
        print(content)
        print("*"*80)
        return {
            "status": "success",
            "content": content,
            "title": pages[page_id]["title"],
        }

    except Exception as e:
        return {"status": "error", "message": str(e)}


def print_fragment(fragment, round_index=0):
    # .act() supplies the round index as the second parameter
    # Setting a default value means the callback is also
    # compatible with .complete() and .respond().
    print(fragment.content, end="", flush=True)

model = lms.llm()
chat = lms.Chat("You are a task focused AI assistant")

while True:
    try:
        user_input = input("You (leave blank to exit): ")
    except EOFError:
        print()
        break
    if not user_input:
        break
    chat.add_user_message(user_input)
    print("Bot: ", end="", flush=True)
    model.act(
        chat,
        [fetch_wikipedia_content],
        on_message=chat.append,
        on_prediction_fragment=print_fragment,
    )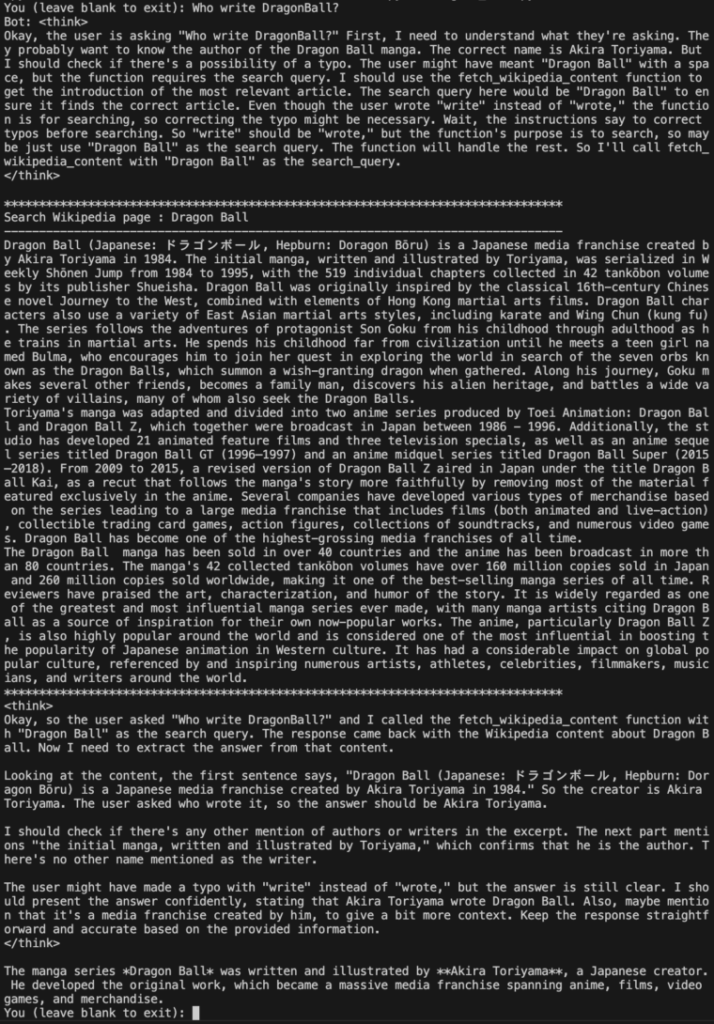
print()Who write DragonBall?という問いに対して、WikipediaでDragon Ballを検索して、その結果を使って回答していることがわかります。
計算などを行う場合に、Pythonコードを実行して確認するものです
import lmstudio as lms
import json
import urllib.parse
import urllib.request
import io
import contextlib

def safe_exec_python(code: str) -> str:
    """
    Tool for executing Python code and returning the output.
    Use this tool whenever the user asks you to write, run, or test Python code.
    Do not simulate the result — always call this tool with actual code.
    """
    buffer = io.StringIO()
    local_vars = {}

    print("*"*80)
    print(f"exec Python Code")
    print(code)
    print("-"*80)

    try:
        with contextlib.redirect_stdout(buffer):
            exec(code, local_vars)
    except Exception as e:
        return f"Error: {e}"

    output = buffer.getvalue()

    print(output)
    print("*"*80)

    return output or "No output"


def print_fragment(fragment, round_index=0):
    # .act() supplies the round index as the second parameter
    # Setting a default value means the callback is also
    # compatible with .complete() and .respond().
    print(fragment.content, end="", flush=True)

model = lms.llm()
chat = lms.Chat("""
You are a task-focused assistant.
If the user asks you to write or execute Python code, use the tool `safe_exec_python`.
Never simulate code execution — always invoke the tool.
""")

while True:
    try:
        user_input = input("You (leave blank to exit): ")
    except EOFError:
        print()
        break
    if not user_input:
        break
    chat.add_user_message(user_input)
    print("Bot: ", end="", flush=True)
    model.act(
        chat,
        tools=[safe_exec_python],
        on_message=chat.append,
        on_prediction_fragment=print_fragment,
    )
print()システムプロンプトに以下のように書いている部分もポイントです。これで、なるべくツールを使って回答するようになります。
chat = lms.Chat("""
You are a task-focused assistant.
If the user asks you to write or execute Python code, use the tool `safe_exec_python`.
Never simulate code execution — always invoke the tool.
""")Is 1023 prime number?のような入力を行うとLLMによっては、Pythonのコードを作成して確認するようになります。
この記事では、LMStudioのPython-SDK(lmstudio-python)を使って、チャットボットを作ったり、関数呼び出しをして回答したりする方法について解説しました。比較的簡単にエージェントライクなものを作れます。あとは、アイデア次第でしょうか。